Okay, here we go! Let me tell you about my paper mache balloon adventure. It was messier than I thought, but hey, that’s half the fun, right?

So, I decided to try paper mache. I figured, “how hard could it be?”. I saw this thing online, “how to paper mache a balloon”, and thought, “perfect! Let’s make something cool!”. I mean, I’ve seen people make awesome stuff, so why not me?
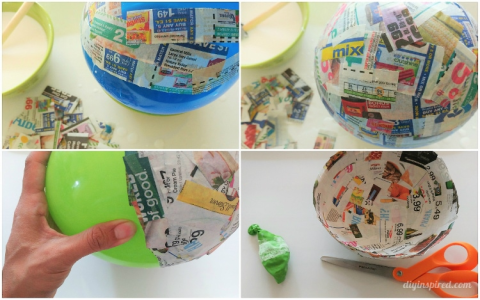
First things first, I blew up a balloon. Not too big, not too small. You know, a good size for a small bowl or something. Then I grabbed a bunch of newspaper – the free kind they leave at my door that I never read, finally it had a purpose! I tore it all up into strips, like, maybe an inch wide and a few inches long. Didn’t measure, just eyeballed it.
Next up: the paste. I mixed up some flour and water. I didn’t really follow a recipe, just kinda mixed it until it looked like thin glue. A little lumpy, maybe, but I figured it’d work. I added a pinch of salt because someone on the internet said it helps prevent mold. Who knows if it’s true, but better safe than sorry, right?
Okay, now for the messy part. I dipped a strip of newspaper into the paste, wiped off the extra (sort of), and stuck it onto the balloon. Then another strip, overlapping the first one. And another. And another. Man, this was getting sticky fast! I kept going until the whole balloon was covered. It looked kinda lumpy and uneven, but I was like, “whatever, it’ll smooth out, right?”.
I let it dry. For like, a whole day. Maybe not long enough, because when I touched it, it was still a little soft in places. But I was impatient, so I went ahead and added another layer of paper mache. This time, I tried to be neater, smoothing out the lumps and bumps. I also used smaller pieces of newspaper, thinking that would help. It did, a little.

Let it dry AGAIN. This time I waited a full two days. It was hard, I kept poking at it. Finally, it felt pretty solid. So, the big moment: popping the balloon! I stuck a pin in it, and pop! The balloon deflated and pulled away from the paper mache shell. Success!
Well, mostly. The top was a little wobbly and uneven where I’d held onto it while applying the paper mache. I thought about cutting it to even it out, but instead, I just left it. Gives it character, right?
After all this, I painted the whole thing white so it would be easier to see what I was doing. After that dried I used some acrylic paints to decorate it with some colorful designs. It looked kinda cool, actually. A bit wonky, but definitely homemade. Now it sits on my desk as a reminder that even if things don’t go perfectly, you can still end up with something kinda neat.
- Materials: Balloon, newspaper, flour, water, salt, acrylic paints.
- Tools: Mixing bowl, paintbrush, pin.
- Total Time: About 3 days (mostly drying time).
Would I do it again? Probably! Next time, I’d try to make the paste smoother and be more patient with the drying time. But hey, it was a fun experiment, and now I have a weird little paper mache bowl thingy. Not bad for a first try, eh?