Okay, so I’ve been wanting to do a Chanel-inspired photoshoot for ages, and I finally took the plunge! It was a lot of fun, and honestly, a bit more challenging than I expected. But I learned a ton, and I’m pretty stoked with how it turned out. I wanna share the whole process, warts and all, so here we go!

Getting Started: The Idea
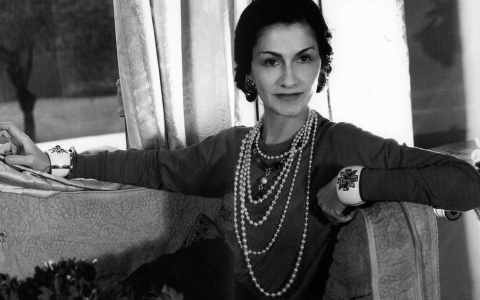
First, I spent a good chunk of time just soaking up Chanel’s vibe. I scrolled through tons of their official photoshoots, runway shows, and even some behind-the-scenes stuff. I wanted to really understand their aesthetic – you know, that classic, elegant, but also kinda edgy feel.
I created a mood board, literally just a bunch of pictures I dragged into a folder on my computer. This helped me narrow down the specific look I was going for. I realized I was drawn to the more monochromatic shoots, with pops of bold color (usually red or gold).
Gathering My Stuff
Next up was figuring out the clothes and accessories. I didn’t want to break the bank, so I decided to work with what I already had and maybe borrow a few things. Luckily, I have a classic black blazer and some simple black dresses that I thought would work well.
For accessories, I dug through my jewelry box and found a few pearl necklaces and some gold earrings. My friend kindly lent me a beautiful vintage-looking scarf, which added a nice touch of sophistication.
Setting the Scene
This was tricky! I don’t have a fancy studio, so I had to get creative with my apartment. I cleared out a corner of my living room and used a large white sheet as a backdrop. I taped it to the wall, making sure it was as smooth as possible (wrinkles are a nightmare to edit out later!).
For lighting, I relied on natural light from my window. It was a cloudy day, which was actually perfect because it gave me a soft, diffused light. I also used a reflector (just a big piece of white cardboard) to bounce some light back onto the shadows.
The Shoot Itself
- Makeup: I tried to keep it classy. A simple winged eyeliner.
- Posing: A learning curve. I kept refering my moodboard for pose inspiration.
- Camera Settings: I shot in manual mode.
The Final Touches (Editing)
After the shoot, I loaded all the photos onto my computer and started the editing process. I used a free photo editing software – nothing fancy. I mostly adjusted the brightness, contrast, and color balance to make the photos look more polished and consistent.
I also did some minor retouching, like removing a few blemishes and smoothing out the backdrop.I’m not a pro at editing, but I think I managed to capture that Chanel-esque vibe I was going for!
Overall, it was a really fun and rewarding experience. I’m definitely planning on doing more themed photoshoots in the future. It’s a great way to get creative, challenge yourself, and learn new skills!