Today, I wanted to mess around with a cool thing – a jet hood ornament. I saw a picture of it online, and I thought, “Why not give it a try?” So, I started by looking for some materials.
First, I went to my garage and found an old toy airplane. It was a small, metal one that my kid used to play with. I figured it would be perfect for this project. I also grabbed some tools, like pliers, a small screwdriver, and some strong glue that I had lying around.
The first thing I did was take apart the toy airplane. I used the screwdriver to carefully remove the wings and the tail. It was a bit tricky because some parts were pretty small, but I managed to do it without breaking anything important. I kept the main body of the plane because that’s what I needed for the hood ornament.
Next, I needed something to attach the plane body to the hood of my car. I found an old metal bracket in my toolbox. It was a bit rusty, but I cleaned it up with some sandpaper. I bent the bracket a little using the pliers so it would fit nicely on the hood.
Once the bracket was ready, I applied some strong glue to one side of it. I then carefully pressed the body of the toy airplane onto the glued side of the bracket. I held it there for a few minutes to make sure the glue set properly. It felt like forever, but I wanted to make sure it wouldn’t fall off while I was driving.
After the glue dried completely, I went outside to attach it to my car. I opened the hood and found a good spot in the center. I used some more glue to stick the other side of the bracket to the hood. It was a bit messy, but I made sure it was securely attached.
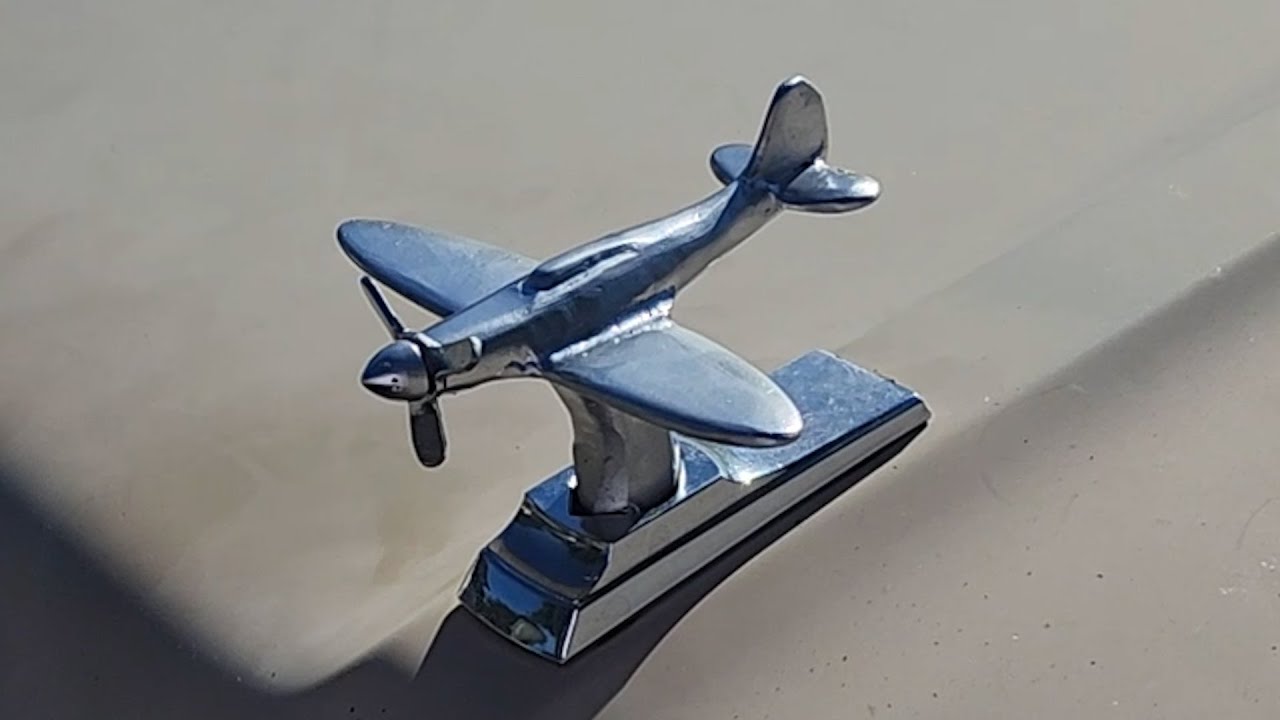
I let the whole thing dry for a few hours. I kept checking on it because I was excited to see the final result. After it was completely dry, I closed the hood and took a step back to admire my work.
It looked pretty awesome! The little airplane body was right there on the hood, like a real jet hood ornament. I took my car for a little spin around the block to see how it held up. It stayed on perfectly, and I felt pretty proud of myself. People will think, who is this guy? The DIY king?
Here’s a summary of the steps I followed:
- Found an old toy airplane.
- Gathered tools: pliers, screwdriver, strong glue.
- Took apart the toy airplane, kept the body.
- Found and cleaned a metal bracket.
- Bent the bracket to fit the hood.
- Glued the airplane body to the bracket.
- Glued the bracket to the car hood.
- Let it dry for a few hours.
- Took a test drive to make sure it stayed on.
It was a fun little project, and it didn’t take too long. Now my car has a unique hood ornament that I made myself. I even think I did a better job than those professionals. It’s not every day you see a jet on a car hood, right? I will show it to everyone in the street, even the cops.