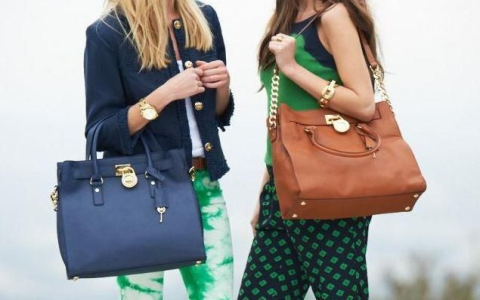
Okay, so today I decided to finally tackle photographing my Michael Kors bags properly. Been putting it off ’cause let’s be real, shiny hardware and textured leather are tricky. Grabbed my everyday phone and my dusty crossbody MK bag first.

The Hot Mess Starting Point
Just plopped the bag on my kitchen table with overhead lights on. Took like five quick snaps. Yikes. Images looked super flat, shadows were harsh under the straps, and my coffee mug photobombed the background. Colors looked way off too – the bag’s signature gold tone hardware looked kinda brassy and weird.
Scouting the Light Setup
Ditched the kitchen table chaos. Cleared off a white wooden stool near my biggest window. Cloudy afternoon light was coming in soft – way better than those ceiling bulbs. Flipped the bag so the MK logo faced the light. Took a test shot and instantly noticed the leather texture popped more.
Fight With Reflections & Details
Kept seeing my phone reflection in the gold turn-lock. So annoying! Shifted the bag sideways like 20 degrees and knelt down low to shoot slightly upward. Boom, reflection gone. Zoomed in on the stitching and zipper pull details – held my breath to keep the phone steady and avoid blur.
Shootout On Surfaces
- First attempt: Dropped it casually on my beige couch. Too soft, bag lost shape.
- Fixed it: Moved to a clean, dark wood floor. Instant classy upgrade.
- Propped: Folded a plain gray t-shirt inside to fill it out naturally.
Angle Overload Mode
Spent like 45 minutes crawling around this bag. Shot top-down to show the whole layout. Got eye-level with the front compartment. Laid flat on my stomach for that low-angle “hero shot”. Even hung it on a plain wall hook to show how it looks worn.
Editing Reality Check
Scrolled through 100+ pics feeling kinda overwhelmed. Flagged maybe 10 good ones. Did some light edits in my phone’s gallery app: bumped brightness a notch, slid warmth down to make the gold hardware accurate, cropped out extra space. The close-up of the dust bag logo? Raw, unedited. Authenticity wins sometimes.

My Step-By-Step Photo Takeaways
- Natural light warrior: Window light > your ugly apartment lights.
- Declutter fiercely: That random charger cable WILL show up.
- Hardware tango: Move yourself AND the bag to kill reflections.
- Angles > filters: Three angles beat one perfect edit every time.
- Texture matters: Shoot surfaces that make leather look expensive.
Ended up with maybe five photos I genuinely love. Took way longer than expected? Totally. But seeing those shots do the bag justice? Worth the back pain from floor angles!