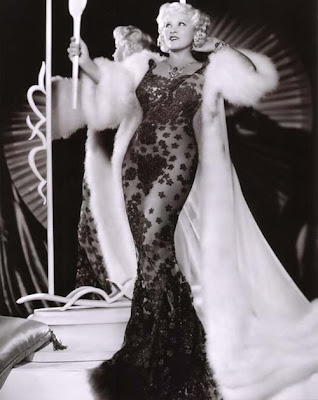
My Journey Crafting That Dress
Alright, so I decided I was going to make that dress. You know the one. The kind that makes you feel like a movie star from way back when. It all started when I saw this amazing piece of fabric, a really lush, deep velvet. It just screamed old Hollywood glamour to me. I just had to have it, even though I didn’t have a clear plan yet.

First things first, I had to get a pattern sorted. I looked through a bunch of my old patterns, but nothing was quite right. Some were too simple, others too fussy. I wanted something that really hugged the figure, you know? So, I ended up mashing a couple of patterns together. Took the bodice from one, the skirt from another, and then did a whole lot of tweaking. Lots of drawing and redrawing on tissue paper. My living room floor looked like a paper factory exploded for a few days.
Then came cutting the fabric. Oh boy, velvet. If you’ve ever worked with it, you know the struggle. It shifts, it slides, it has a nap you absolutely cannot ignore. I pinned like my life depended on it. Seriously, probably used a whole box of pins. I laid it all out on the floor, double-checked the nap direction about a hundred times, and then very, very carefully started cutting. Slow and steady, that was my mantra.
Sewing the main pieces wasn’t too bad. I started with the bodice, getting those darts just perfect. That’s key for the fit. Then I moved onto the skirt. I wanted it to be quite fitted through the hips and then flare out just a little at the bottom. I spent a good amount of time basting and trying it on. This happened a lot: sew a bit, try it on, rip a bit, sew again. My seam ripper and I became very close friends during this phase.
The tricky part was getting the structure right. I didn’t want to use boning, not for this one. But I needed some support. So, I interfaced the heck out of the bodice lining. I used a fairly stiff interfacing, hoping it would give that smooth, sculpted look. Attaching the lining to the velvet without any puckers was a real test of patience, let me tell you. Velvet just doesn’t forgive easily.
Then there were the sleeves. I went for a slim, long sleeve. Simple, but elegant. Getting them set in smoothly took a couple of tries. You know how it is, one sleeve goes in like a dream, the other fights you every step of the way. Classic.
Finally, the zipper and the hem. I opted for an invisible zipper in the back. Always a bit nerve-wracking to cut into the nearly finished dress for the zipper, but it had to be done. I took my time, hand-basted it first, then stitched it very carefully. For the hem, because it was velvet, I decided on a hand-stitched hem. It just gives a nicer finish, I think, especially on a fabric like that. Took ages, sitting on the couch, slowly stitching, but it was worth it.
And then, it was done. I stood back and looked at it on my dress form, and yeah, it felt pretty good. It wasn’t perfect, there are always little things you notice yourself, but it had the vibe I was going for. That really figure-hugging, glamorous feel. Putting it on, I definitely felt a bit more… statuesque. It was a process, a real labor of love, but seeing it complete made all the unpicking and re-stitching totally worth it.